If a Vinted listing has no measurements, I usually do not message the seller. I just do not buy it. When I sell something myself, I put in as many useful measurements as I can because I would rather spend two minutes with a tape measure once than dig the same shirt back out every time somebody asks.
That is the problem for sellers: missing measurements do not necessarily cost you a question. Sometimes they cost you the sale.
You do not need to measure every conceivable part of a garment. Knowing how to measure clothes properly is mostly about choosing the few dimensions that tell somebody whether the thing has a reasonable chance of fitting, then taking them in a way another person can reproduce on something they already own.
Garment measurements are not body measurements
This is the first distinction to get right.
If you measure your chest with a tape around your body, you have a body measurement. If you lay a shirt flat and measure straight across it from one underarm to the other, you have a garment measurement. They are not interchangeable.
Proper Cloth distinguishes between the two in its sizing guidance: width measurements taken with a garment lying flat represent half of the approximate circumference, so doubling the width gives the approximate circumference at that point.
Suppose a shirt measures 54 cm / 21¼ in across the chest when laid flat. Its circumference there is roughly 108 cm / 42½ in. That does not mean it is designed for somebody with a 108 cm / 42½ in chest; clothes need differing amounts of room depending on their cut, fabric and how the wearer likes them to fit.
For online second-hand shopping, there is a much easier comparison: take a similar garment that already fits you and measure that in the same way.
A size label gives you somewhere to start. The tape measure gives you something to compare.
How to measure clothes consistently
Use a flexible measuring tape and a reasonably large, flat surface. A table is ideal; the bed will do if it is firm enough that the garment is not sinking into the duvet like a body being hastily concealed.
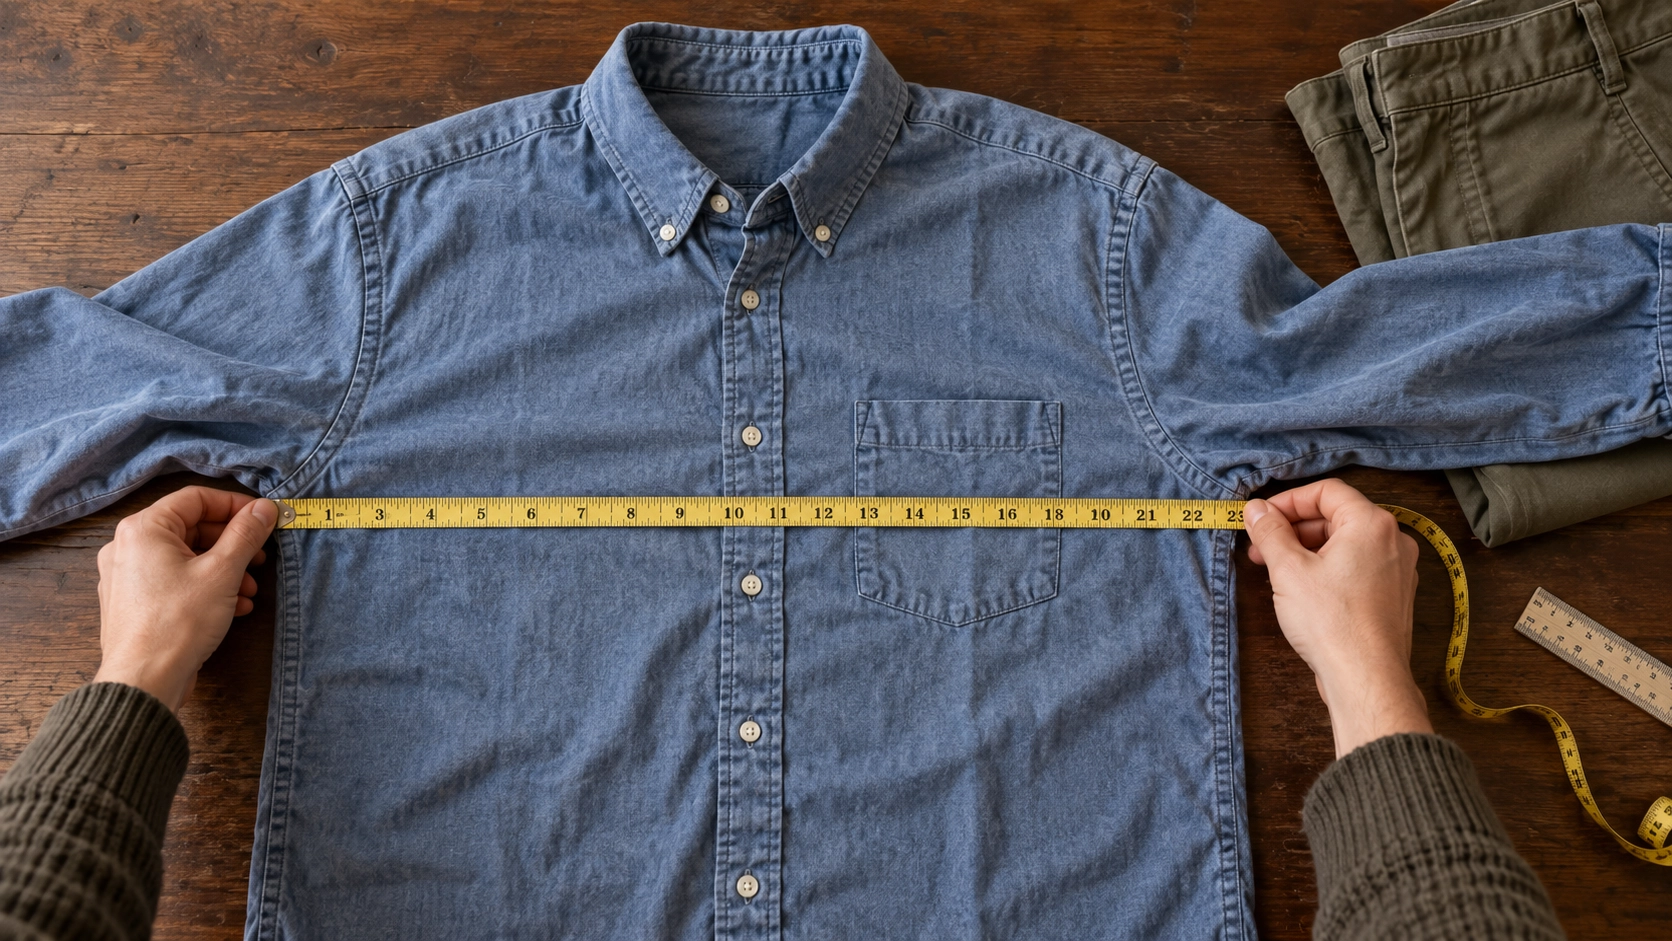
Fasten buttons and zips that affect the shape of the garment. Lay it naturally, smooth out obvious wrinkles and folds, and make sure none of the fabric has tucked itself underneath. Smooth does not mean stretched: especially with jersey, knitwear and elastic, pulling the fabric taut will produce a very impressive measurement for a garment that does not ordinarily exist at that size.
I record metric first and imperial second — for example, 54 cm / 21¼ in — so somebody shopping in either system does not have to leave the listing and do the conversion themselves. Etsy’s Seller Handbook recommends listing clothing measurements in both metric and US standard systems for international shoppers.
For sellers, state that the measurements were taken flat. For buyers, check whether the numbers in a listing are flat garment measurements, full circumferences or body measurements before comparing them with anything.
Consistency matters more than pretending there is one sacred method handed down with the first tailor’s tape.
How to measure T-shirts, shirts and tops
For most tops, four measurements will answer the useful questions: chest, shoulders, sleeve and length.
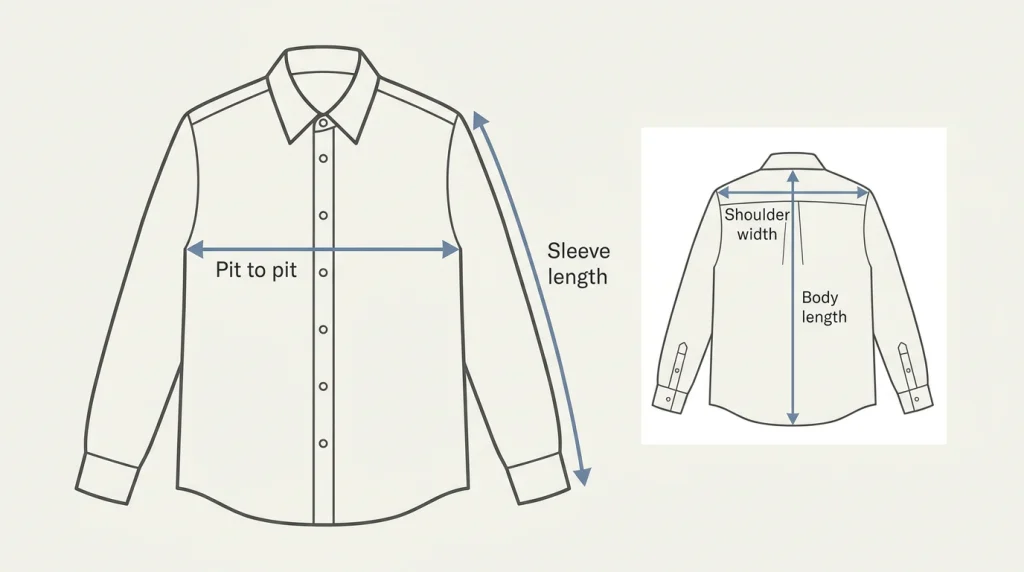
Pit-to-pit is a useful chest measurement: the flat width of the garment from one underarm point to the other. Lay the top on its back, smooth the body without stretching it and measure straight across from the bottom of one armpit to the other.
Measure shoulder width across the back, from the point where one shoulder seam meets the sleeve to the equivalent point on the other side. This is easiest on a conventionally constructed shirt where the seams give you an obvious landmark.
For sleeve length, state where you started. On a straightforward set-in sleeve, measuring from the shoulder seam to the end of the cuff is easy for another person to reproduce. Some formal-shirt measurements instead begin at the centre back of the neck and run across the shoulder and down the sleeve. Whichever method you use, say so rather than leaving the buyer to guess.
For body length, I would measure down the centre back from the base of the collar to the hem on a collared shirt. For a T-shirt or simple top, measure from the highest shoulder point beside the neckline to the hem and describe it that way.
Do not bury the method beneath the number. “Length: 72 cm / 28⅜ in, shoulder to hem” is much more useful than “length 72”.
How to measure jackets and coats
Jackets deserve slightly more care because structure makes them less willing to lie flat.
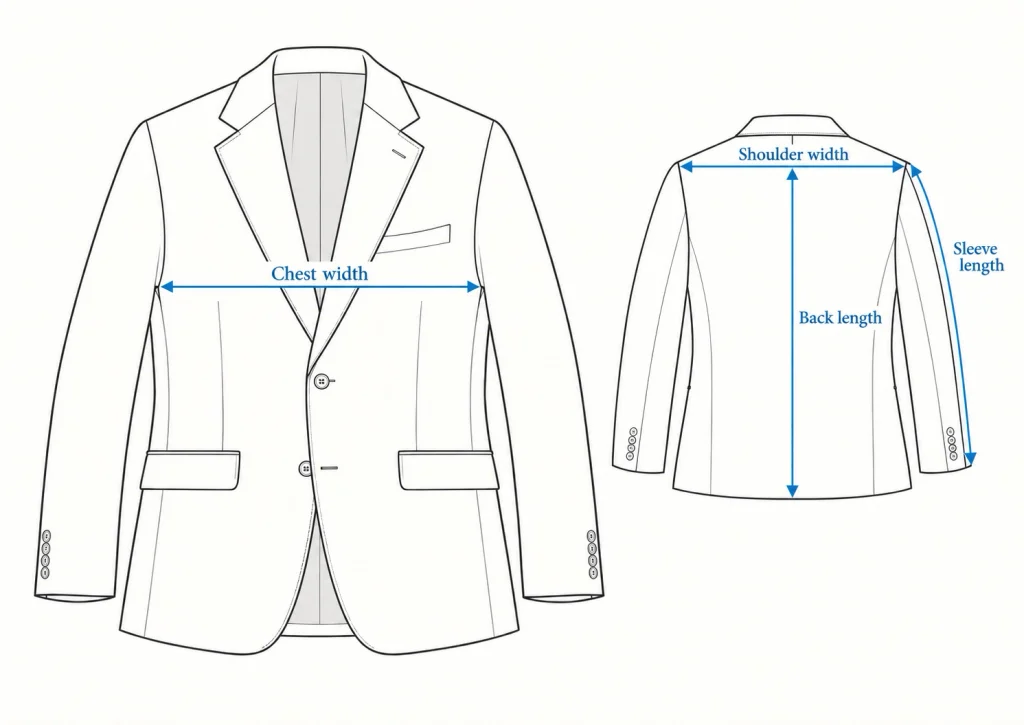
Button the jacket normally before taking the chest measurement. Smooth the chest and sides without forcing the lapels or shoulder structure out of shape, then measure straight across between the underarm points.
For shoulder width, turn the jacket over and measure straight across from the point where one shoulder seam meets the sleeve to the corresponding point on the other side.
Measure the sleeve from the top shoulder seam to the cuff, following the sleeve rather than pulling it into an unnatural straight line.
For back length, lay the jacket face down and measure down the centre back from the collar seam to the bottom hem.
These measurements tell you a great deal about size. They cannot tell you everything about fit. A jacket can apparently have the right chest and sleeve length while still sitting badly through the shoulders or upper back. I have covered those harder-to-change areas separately in How to Buy a Second-Hand Wool Coat That Survives More Than One Winter.
How to measure trousers and jeans
Trousers are where relying on the label becomes especially unhelpful. A waistband number cannot tell you the whole shape of the garment.
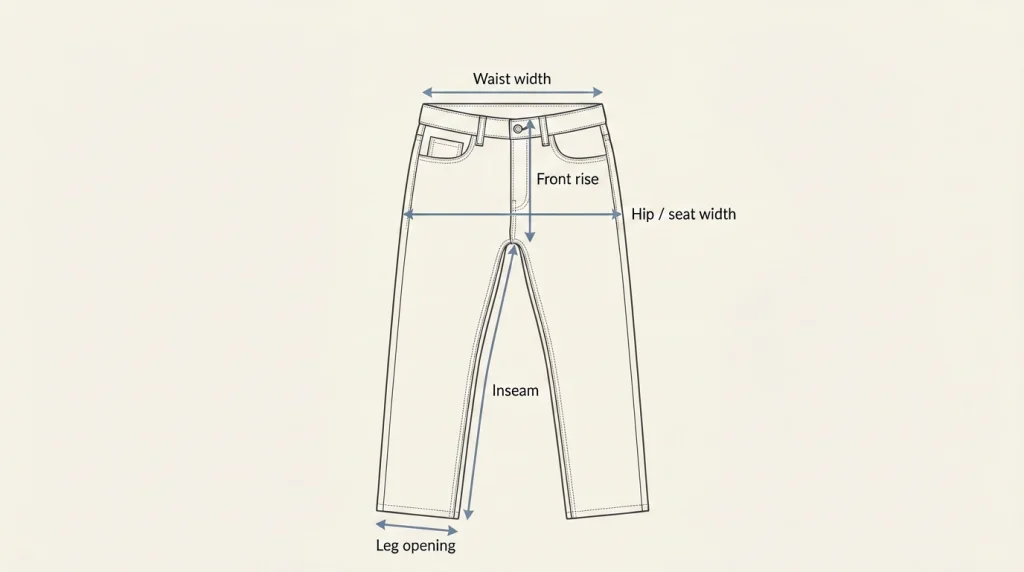
Start with the trousers buttoned and zipped and lay the waistband flat, with the front and back aligned naturally. Measure straight across from one end of the waistband to the other. This is the flat waist measurement. If somebody wants the approximate circumference of the garment, double it — but keep the listing itself explicit about which number you are giving.
Next measure the inseam along the inside leg, from the crotch seam to the hem. Flatten one leg sufficiently to follow the seam without stretching the cloth.
Include the front rise as well, measured from the top of the front waistband to the crotch seam. I have already gone into what rise actually does to trouser fit and proportion in The Trousers Fit at the Waist. Why Do They Still Look Wrong?, so I will not smuggle half of that article in here under cover of a tape measure.
The leg opening is measured straight across the hem while the leg is lying flat. That is particularly useful with flared, wide, tapered or very narrow trousers, where two pairs with similar waist and inseam measurements can have completely different silhouettes.
A hip or seat width can also be useful on fitted trousers. Because the most useful measuring point can vary with the cut, state exactly where you placed the tape if it is not obvious rather than producing a mysterious “hips” number and leaving everybody else to reconstruct your method.
How to measure skirts
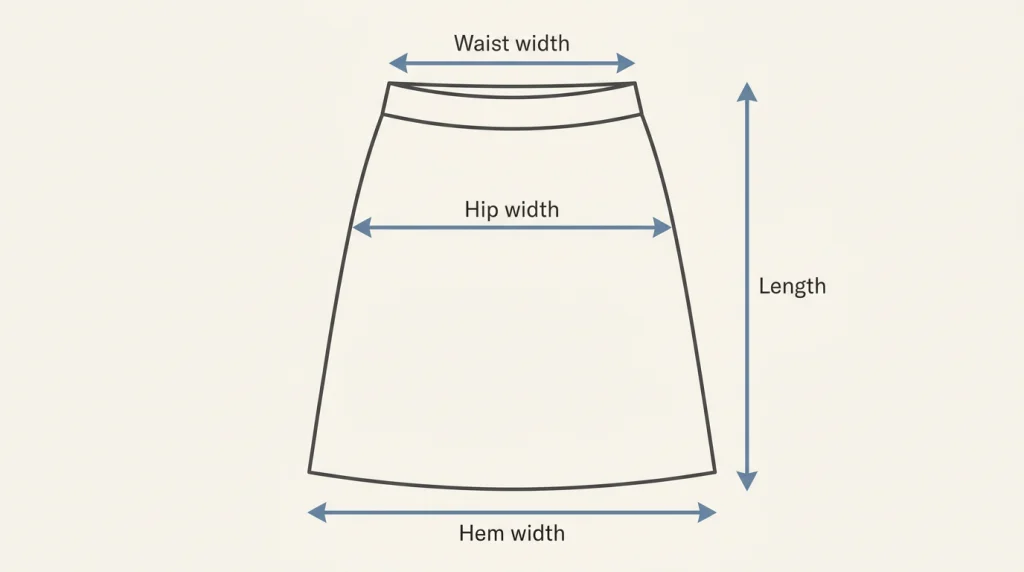
For a skirt, the waistband and length are the essentials; hip width becomes important when the skirt is fitted through the seat.
Fasten the skirt, lay the waistband flat without stretching it and measure straight across. If the waistband is elasticated, give the relaxed measurement first. If you also provide a stretched measurement, label it clearly and stretch only as far as the waistband would reasonably be worn rather than discovering its absolute mechanical limit.
For a fitted skirt, measure across the widest part of the hip or seat. If there is no seam or construction line showing exactly where you took it, say where the tape was placed so a buyer can reproduce it on their own skirt.
Measure length from the top of the waistband straight down to the hem. With an asymmetric skirt, give the shortest and longest lengths rather than averaging them into a number that describes no part of the actual garment.
Hem width can be worth adding where the amount of flare matters. A pencil skirt and an A-line skirt might share waist and hip measurements and still behave quite differently once you attempt to walk somewhere.
How to measure dresses
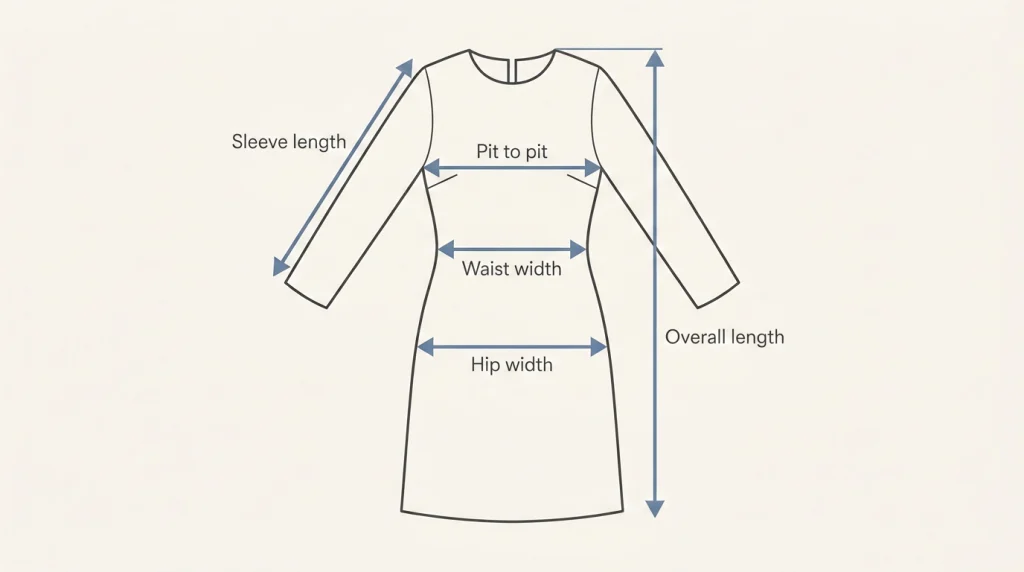
Dresses combine the useful measurements of tops and skirts, so the trick is deciding which ones actually affect the shape.
Start with pit-to-pit across the chest. On a shaped dress, add the flat waist and hip widths. A loose shift dress may not have a meaningful waist measurement at all; there is no prize for producing one merely because the tape was already in your hand.
Measure the overall length from a clearly stated shoulder point to the hem. If the dress has conventional sleeves, add sleeve length from the shoulder seam to the cuff. For a fitted dress, chest, waist, hips and length are usually far more informative together than the size label on its own.
If the hem is asymmetric, curved or stepped, give the relevant shortest and longest lengths. If the waist is elasticated, distinguish its relaxed width from any stretched measurement.
Raglan sleeves, stretch fabric and other awkward garments
Some clothes refuse to provide the neat seams a diagram would prefer.
A raglan sleeve, for example, runs into the neckline rather than meeting the body at a conventional shoulder seam. In that case, do not invent a shoulder point. Give a neck-to-cuff sleeve measurement and state exactly where you started the tape.
Dropped shoulders create a similar problem: the physical shoulder seam may sit well down the upper arm, so it tells the buyer something about the garment’s construction but not much about the width of the wearer’s shoulders. Give the measurement if it is useful, but label the garment as dropped-shoulder so the number has context.
With stretchy knitwear, jersey and elasticated garments, take the basic measurements with the fabric relaxed. You can add stretch information if it genuinely helps, but a garment’s ability to be dragged to a particular width does not tell somebody whether wearing it there would be comfortable or whether the elastic would be delighted about the arrangement.
This is where a short fit note earns its space.
Buyers: compare clothes with clothes
If you are buying online, you do not need a garment identical to the one in the listing. You need something similar enough to answer the particular fit question worrying you.
For a shirt, compare pit-to-pit, shoulder and length with a shirt you already like. For trousers, compare flat waist, rise and inseam with trousers that sit where you want them to sit. For a coat, pay particular attention to chest, shoulders, sleeve and back length.
Proper Cloth recommends measuring an existing shirt that already fits when creating garment dimensions. The principle is useful well beyond made-to-measure clothing: compare the listing with a garment whose fit you already understand.
Measurements are the useful bit that photographs and search terms cannot supply on their own. I wrote more about that problem in The Search Box Is Not an Oracle: finding the right-looking garment online is only the first half of deciding whether it is actually worth buying.
Do not chase identical numbers blindly. A soft knitted jumper and a rigid denim jacket can have the same flat chest width and feel nothing alike. Compare garments that are reasonably similar in construction and intended fit, then use the numbers to identify differences deliberately.
If your favourite shirt is 54 cm / 21¼ in pit-to-pit and the one online is 48 cm / 18⅞ in, that is useful information. You may still want the smaller one. At least you are choosing six centimetres rather than discovering them when the parcel arrives.
Sellers: make the listing answer before somebody asks
I put measurements into my Vinted listings when I create them. Partly that is helpfulness; partly it is selfishness. Once an item is photographed, listed and put away, I have no desire to excavate it again because someone wants the sleeve length.
Vinted’s UK Buying Basics guidance tells buyers to double-check an item’s dimensions before buying. Depop’s seller guidance recommends adding exact measurements and fit notes because sizing varies between brands.
I also use fit notes when a label is likely to be unhelpful to the person reading it. With Japanese-sized clothes, for example, I list whatever size is actually printed on the garment. If a Japanese M seems to me to fit more like a UK S, I will say that in the description as my fit assessment, and then give the measurements so the buyer can make their own decision.
A compact listing can simply say:
Measurements taken flat and unstretched.
Pit to pit: 54 cm / 21¼ in
Shoulders: …
Sleeve: …
Length: …
For trousers, swap those fields for flat waist, rise, inseam and leg opening. For a skirt or dress, add the points that actually determine its shape.
The useful listing is not the one with the greatest possible quantity of numbers. It is the one that lets a buyer work out whether the garment is worth buying without having to begin a small correspondence course first.
And for sellers, that matters because the buyer who needs one missing measurement may never ask for it. They may simply keep scrolling.
Leave a Reply