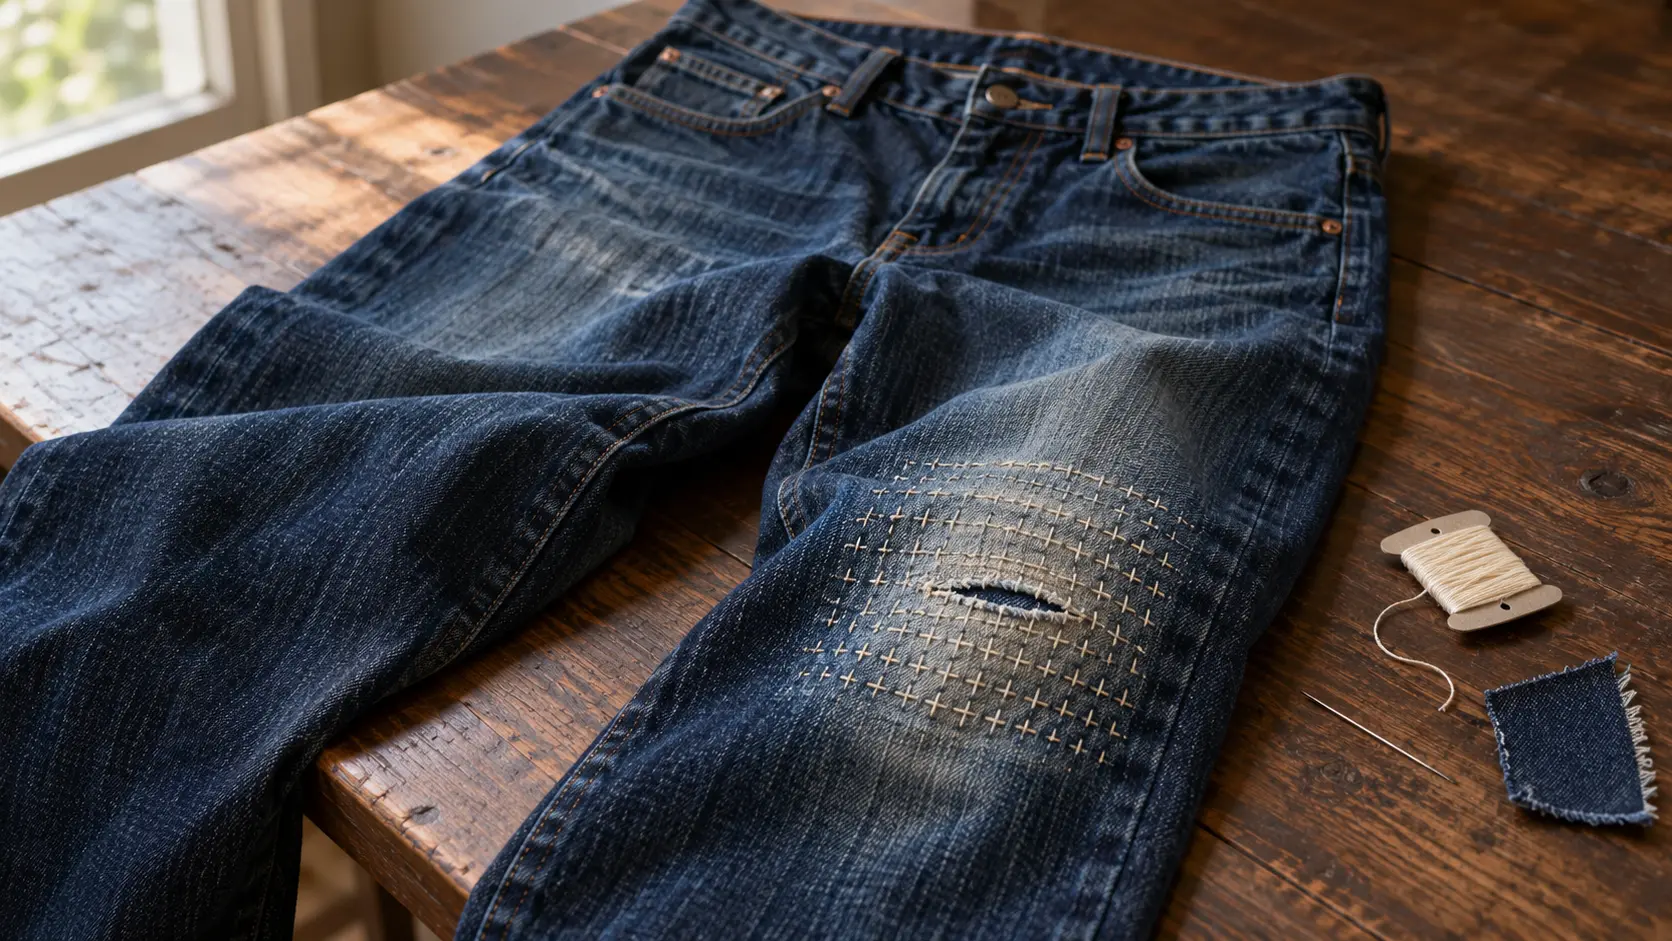
The left knee of my jeans had been becoming steadily less like denim for months.
They are a dark-indigo pair I bought second-hand in Shrewsbury in the spring of last year, straight through the leg and faded enough now that the knees are visibly lighter than the thighs. One patch on the left knee had thinned first. Then a horizontal tear appeared through it, which finally defeated my existing maintenance programme of noticing the problem every time I put them on and doing absolutely nothing about it.
I could have tried to make the repair disappear. Instead I decided to give it something solid underneath and let the stitching show.
That is the useful part of visible mending. A damaged garment does not have to return looking untouched. It does, however, still have to be repaired. Pretty stitches floating around cloth that is continuing to disintegrate are embroidery with a structural problem.
The method I used on these jeans takes some of its practical logic from sashiko: a patch beneath the worn cloth, with running stitches passing through both layers to hold and reinforce the area. Before getting anywhere near the needle, though, it is worth separating that contemporary repair from the history that supplied the vocabulary.
Sashiko and boro are not two names for the same look
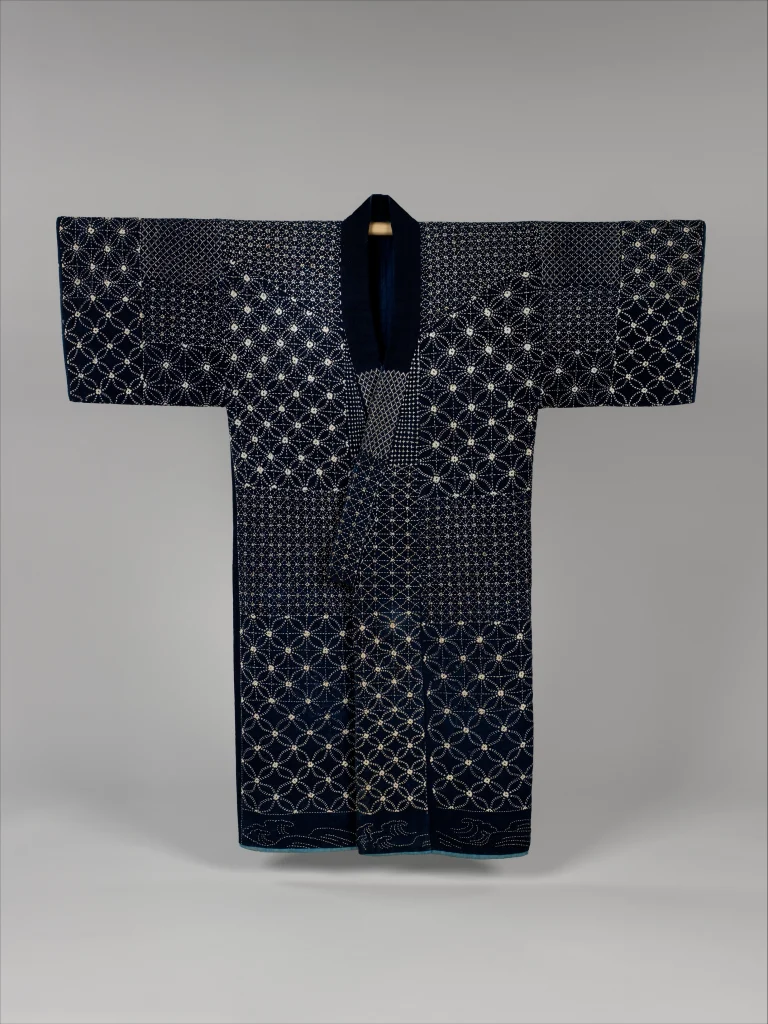
Sashiko is a Japanese quilting and stitching technique based on running stitch — the simple in-and-out stitch that leaves alternating lengths of thread on the face and back of the cloth. The Metropolitan Museum of Art describes it as a technique used to reinforce and prolong the life of textiles or join recycled pieces together; its nineteenth-century sashiko jacket shows how practical reinforcement could also develop elaborate decorative pattern.
Boro is broader. The Victoria and Albert Museum uses the term for textiles repeatedly reworked through piecing, patching and stitching to extend their use. Sashiko can occur within boro — the V&A specifically describes running stitches sewn through layers for reinforcement — but boro is not the name of a stitch or a pattern you can add to a pair of new jeans.
That distinction matters because modern visible mending has made the visual language extremely easy to borrow. Indigo cloth, white stitches, an irregular patch and suddenly the internet has labelled something “boro” that acquired its first hole twenty minutes earlier.
Boro has a history that the prettiness can hide
There is an awkward habit in modern craft writing of encountering something beautiful that grew out of poverty and immediately promoting the poverty into a philosophy.
The Museum of Far Eastern Antiquities in Stockholm gives a much plainer account. Its exhibition Boro — The Art of Necessity described cold, historically poor communities in northern Japan where farmers’ and fishermen’s jackets, blankets and other textiles were repeatedly repaired, reinforced and reworked because resources were scarce. The museum also notes that boro later had a low status and could be regarded as a shameful reminder of poorer times before becoming collectible, exhibited and imitated by fashion.
The V&A supplies an especially useful detail. On some surviving boro panels, the side now prized for its dense, irregular patching was actually the back or inside; more care had been taken over arranging the side people were going to see. Its late nineteenth-century utilitarian robe is made entirely from recycled indigo-dyed cotton that was pieced, patched and repaired again.
So I am wary of turning boro into a cheerful injunction to “embrace imperfection”. Some people were repairing cloth because replacement cloth was precious or inaccessible, and later generations could regard those same textiles as evidence of poverty rather than picturesque objects.
I can admire what survives without pretending my optional Sunday-afternoon repair occupies the same circumstances.
Start with the damage, not the pattern
The left knee had one tear just over three centimetres across, but the obvious opening was not the whole problem. The denim surrounding it had thinned over a much larger patch.
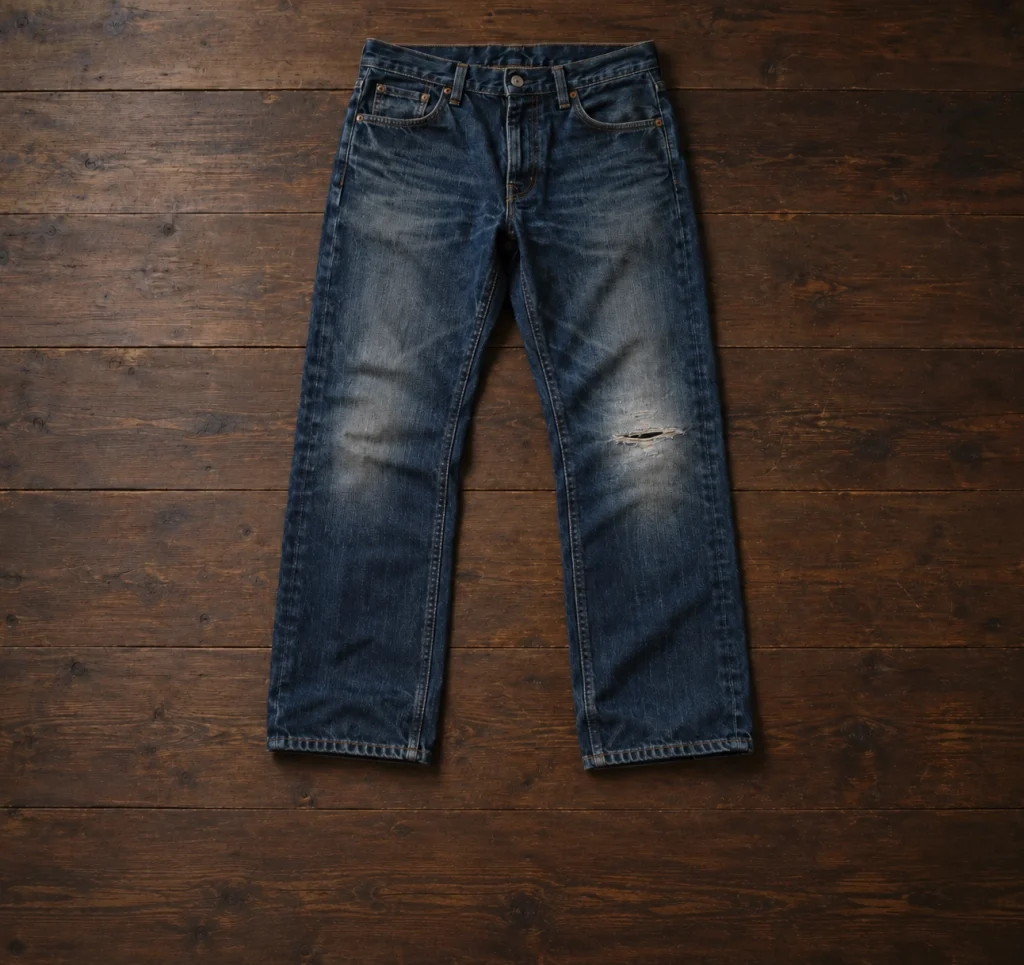
That is the area I wanted the repair to support.
This follows the same basic judgement I use elsewhere in clothing care: look at the material immediately around the fault rather than staring only at the most dramatic bit. My broader beginner’s clothing-care guide starts with exactly that inspection, and the distinction matters even more with repairs. A stitch needs sound enough material around it to do useful work.
For this repair I followed the sequence published by TOAST repair specialist Molly Martin. She recommends matching the patch material to the original garment as closely as practical and using something hard-wearing for jeans. The patch edges are folded and pressed, then the patch is pinned behind the damaged cloth before the visible stitching begins.
I used an eleven-by-nine-centimetre piece of dark denim. Those measurements describe my patch, rather than a formula for yours: the point was simply that it extended beyond the whole thin area instead of covering the open tear by a grudging few millimetres.
I put the patch behind the jeans
I turned the jeans inside out, folded the raw edges of the denim patch under and pressed them flat. Then I centred it over the damaged area from behind and pinned it in position.
The next stage was tacking — loose temporary stitches whose only job is to stop the layers wandering around while the permanent sewing happens. I used red thread so there was no possibility of later mistaking it for part of the finished repair, and worked a rough rectangle around the patch. TOAST’s instructions use the same sequence: pin the patch from inside, loosely tack it in a contrasting thread, then turn the garment right-side-out again.
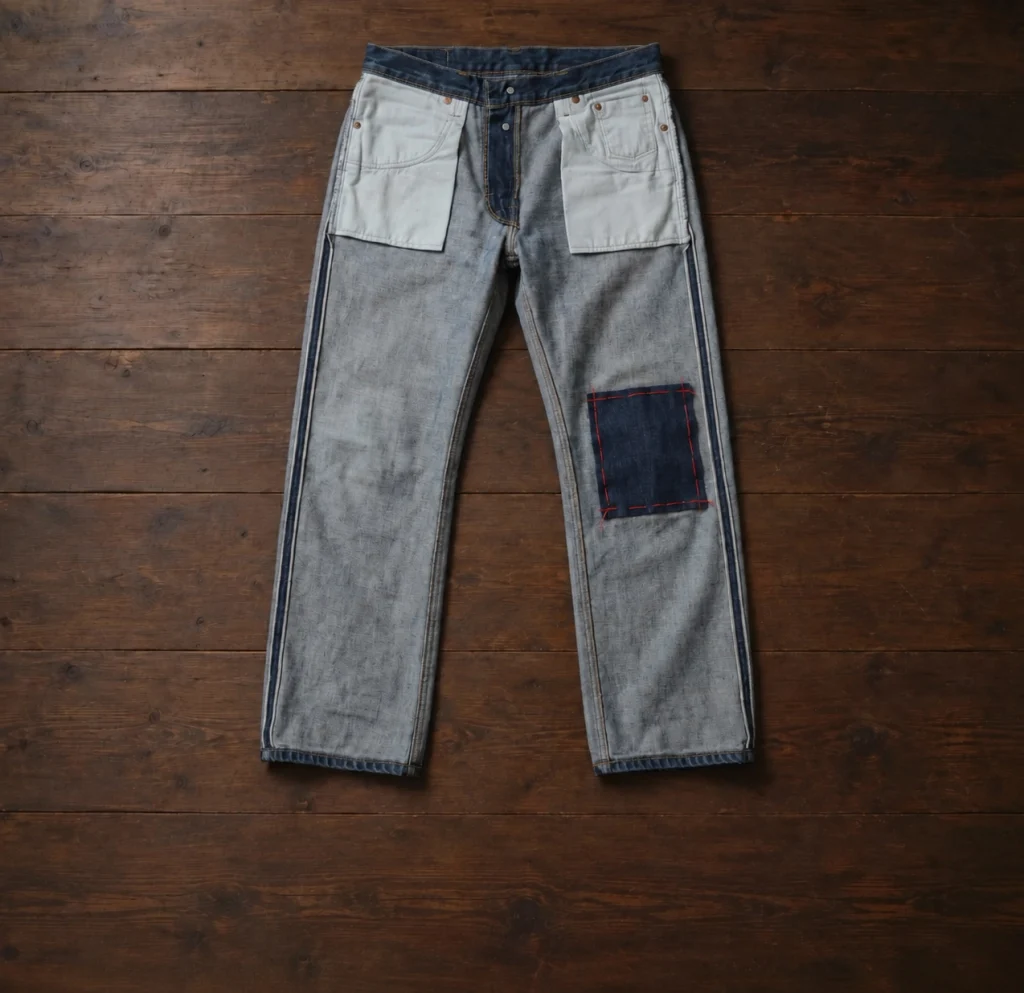
Once the jeans were right-side-out again, the red tacking gave me the boundary of the fabric sitting underneath. The permanent stitching then went through both layers.
TOAST’s instructions use small, close running stitches worked back and forth across the damaged area and into the surrounding cloth, followed by stitching in the opposite direction to reinforce the patch as a quilted area. The V&A’s description of sashiko makes the same constructional point: these are running stitches through layers of fabric.
The patch is not sitting decoratively beside the hole. The stitches are physically fastening the worn jeans to the sound cloth behind them.
The first thread colour lasted about four minutes
I began with bright white thread because white on indigo is the combination I had been looking at in museum objects and repair examples.
On my jeans it looked awful.
There was nothing technically wrong with it. I had simply managed to make an old, faded pair of jeans look as though a craft kit had recently attacked the knee.
I unpicked the short row I had done and changed to a dull cream. The difference is small enough to sound fussy and large enough that I would absolutely do it again. The cream still makes the repair visible, but it sits more comfortably with denim that has already faded towards grey-blue around the knee.
The rest of the stitching stayed very simple. Straight rows crossed by another set of rows in the opposite direction, close enough to hold the damaged denim against the patch underneath. I did not copy a named traditional sashiko pattern. The repair already had a job.
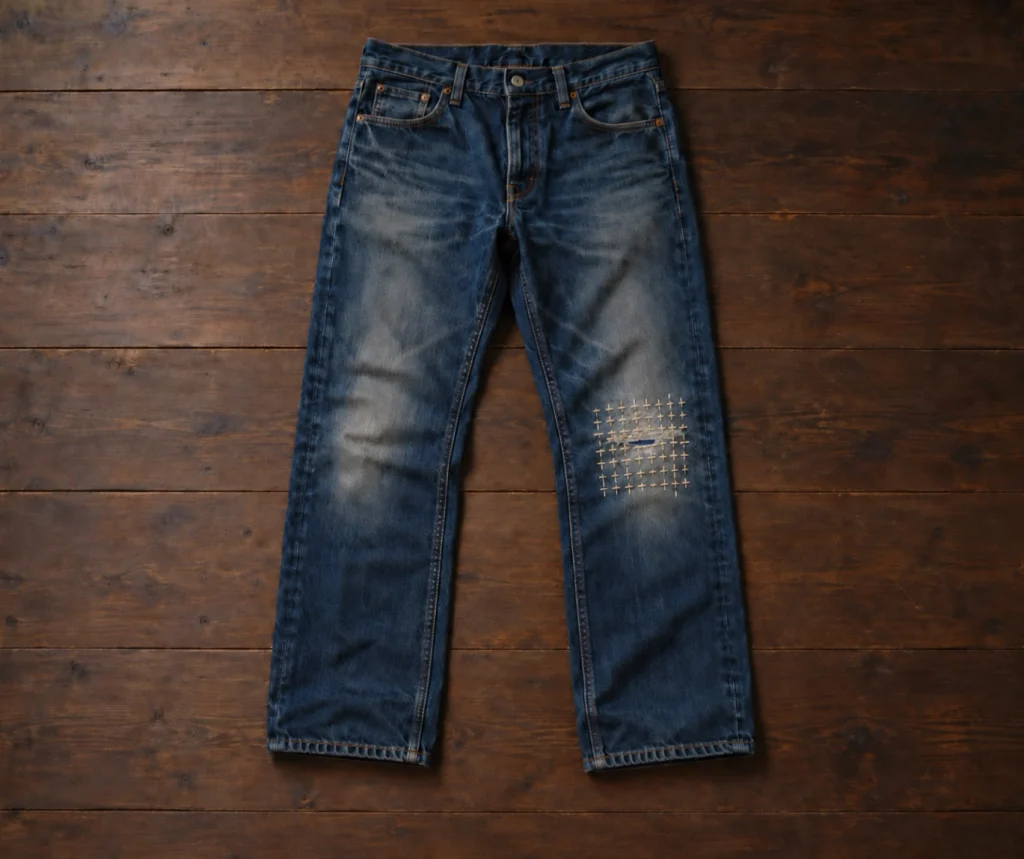
When the permanent stitching was complete, I turned the jeans over and removed the red tacking thread from the back.
The tear was still there. It now had somewhere to go.
Visible mending does not have one look
My jeans ended up with a fairly obvious cream grid across dark denim. That is one version of visible repair, not its uniform.
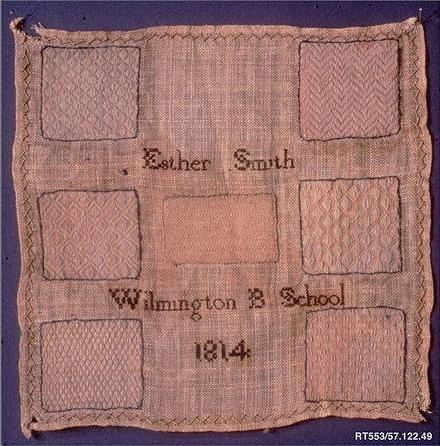
Darning samplers make the point rather beautifully. In 1814, Esther Smith made one at the Wilmington Boarding School in Delaware containing seven different blocks of repair work. The Metropolitan Museum of Art says each block represented a different weave pattern that could be reconstructed over worn cloth or a hole; one appears to practise a repair suitable for wool stockings. It is essentially a sheet of carefully arranged rehearsals for the moment somebody’s stocking, towel or tablecloth gives up.
The V&A has British and Dutch examples that make the same practical skill look quite different again. Eliza Broadhead made a darning sampler at the Quaker school at Ackworth in Yorkshire in 1785; the V&A describes it as a deliberately utilitarian demonstration of the skills she would need to mend clothes later in life. Gerarda Gerritsen’s 1763 sampler from Middelburg is more elaborate and signed — part of a Dutch tradition the museum notes was often more decorative than its English counterpart.
There is a useful reversal there. A sampler could advertise how well somebody had learnt to make a repair disappear. Visible mending today can choose to do almost the opposite.
The V&A’s own collection of staff mending stories gives much less formal examples. One fawn cashmere jumper had worn elbows covered with red patches cut from an old jumper; another thirty-year-old jumper had been darned repeatedly in whatever bright colours happened to be useful rather than carefully matched. Neither resembles my cream grid, and neither needs to. One patch announces itself as a new piece of cloth; another repair accumulates colour as the garment accumulates years.
That is more useful to me than treating visible mending as an aesthetic recipe. The repair can contrast sharply, nearly disappear, rebuild missing cloth or put another piece of cloth behind it. What matters first is what has failed and what will make it wearable again. The decision to make that work conspicuous comes afterwards.
Visible mending is not the answer to every hole
This repair was local damage in sturdy woven cotton with sound cloth around it.
I would not automatically transfer the same method to a stretched knit, silk, an unstable vintage fabric, waterproof technical clothing or a structural failure simply because all of them can technically contain a hole. TOAST’s own repair service chooses between sashiko, darning, patchwork, appliqué and other methods according to the fabric and the fault rather than treating visible stitching as one universal cure.
A seam opening is another different problem. When the stitching has failed but the cloth remains sound, replacing the missing stitches may be all that is required; that is why the split lining in my herringbone coat needed a slipstitch rather than a decorative patch over the top.
There is no prize for forcing an interesting technique onto the wrong fault.
The jeans now have a cream grid across the left knee, with the original tear still visible between the stitches.
I can see where they failed, and I can see what I did about it.
Leave a Reply